
I've been swimming in Chili con Carne lately, have you tried it yet?
Using dried chiles will give you a massive upgrade in flavor and will most likely put this classic Tex-Mex dish on regular rotation for you.
Please give it a go when you're craving comfort food as it fits the bill perfectly 🙂
How To Make Chili con Carne
I used a mix of Anchos and Guajillos for this batch:
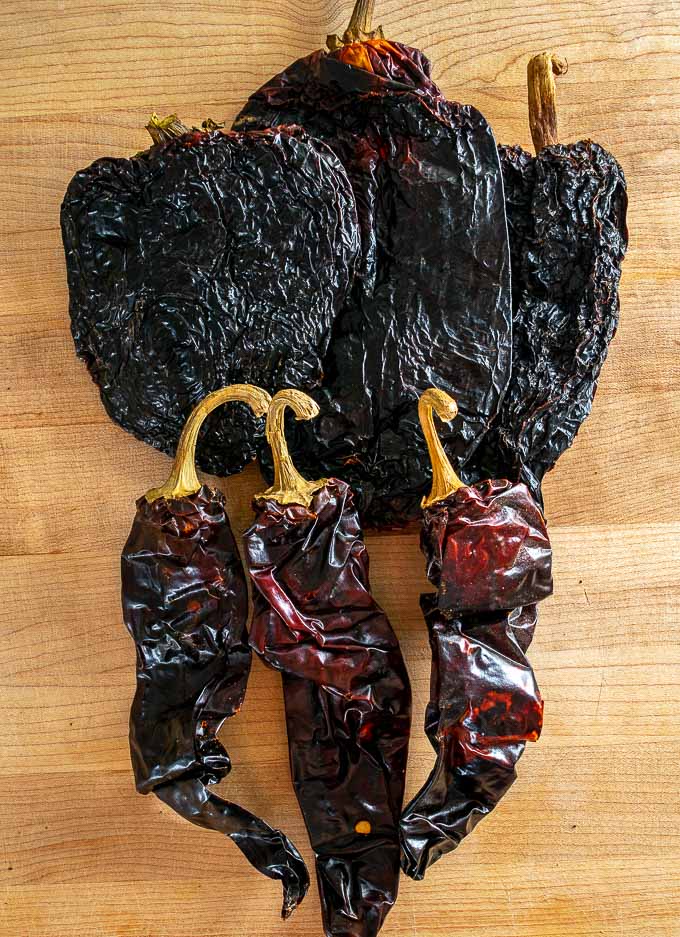
But there's leeway on the chiles, so don't worry about matching the exact combo I used. For example, I've used New Mexican chiles in place of Guajillos before and still got a great result.
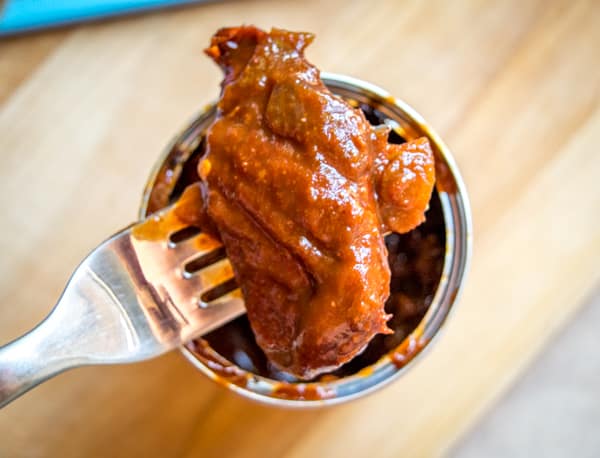
I also added a chipotle in adobo for additional heat and smokiness, but you can consider this optional. Working with chipotles in adobo.
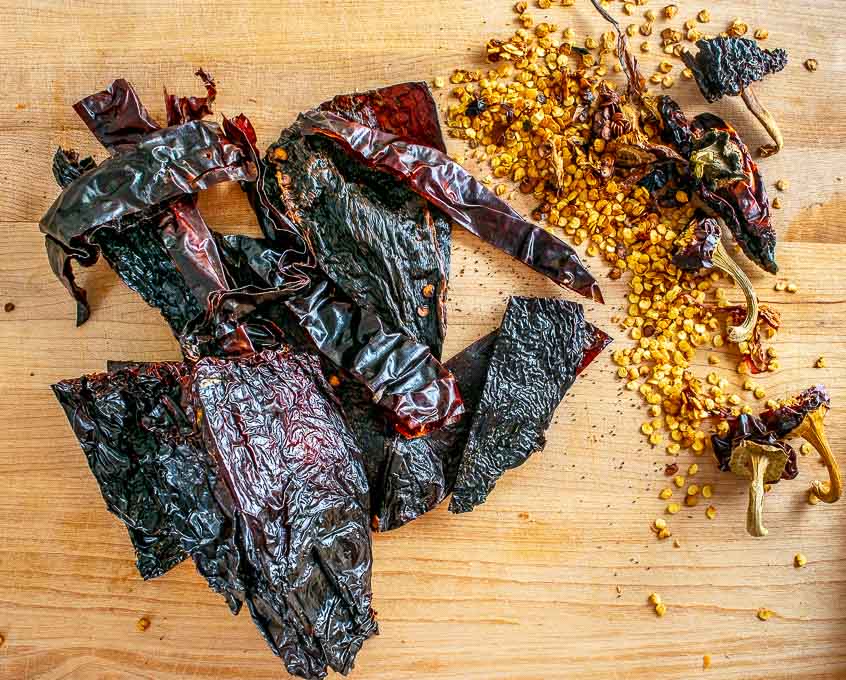
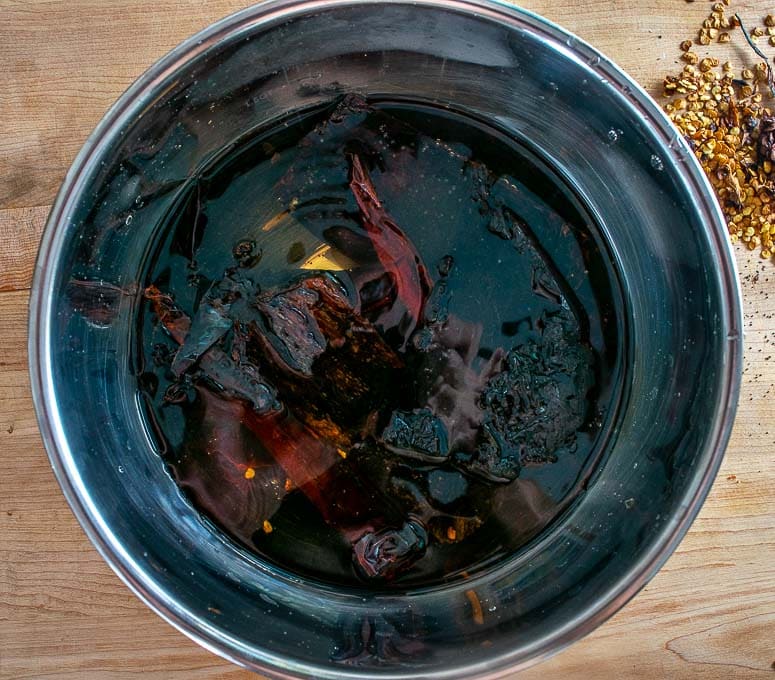
I usually start by de-stemming and de-seeding the dried chiles, but it's not crucial to get rid of every last seed so don't sweat it too much.
Then I typically give these chile pieces a quick roast in the oven (400F) for 1-2 minutes to wake them up.
Cover the roasted chile pieces with hot tap water and let them reconstitute for 20-30 minutes, or until you need them. You can use a small bowl or plate to keep them submerged if they float to the top.
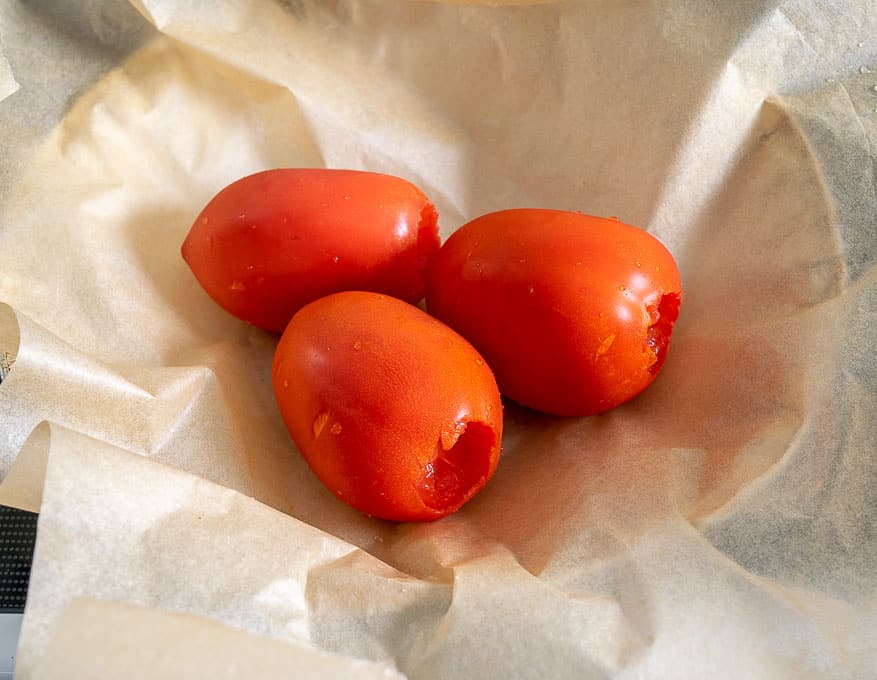
I'm also in the habit of roasting tomatoes for this recipe, so I usually put 3-4 Romas in the oven before working on the meat.
There's an extended simmer coming up so it's not crucial to fully roast the tomatoes -- I usually just throw them in the oven and grab 'em when I need 'em.
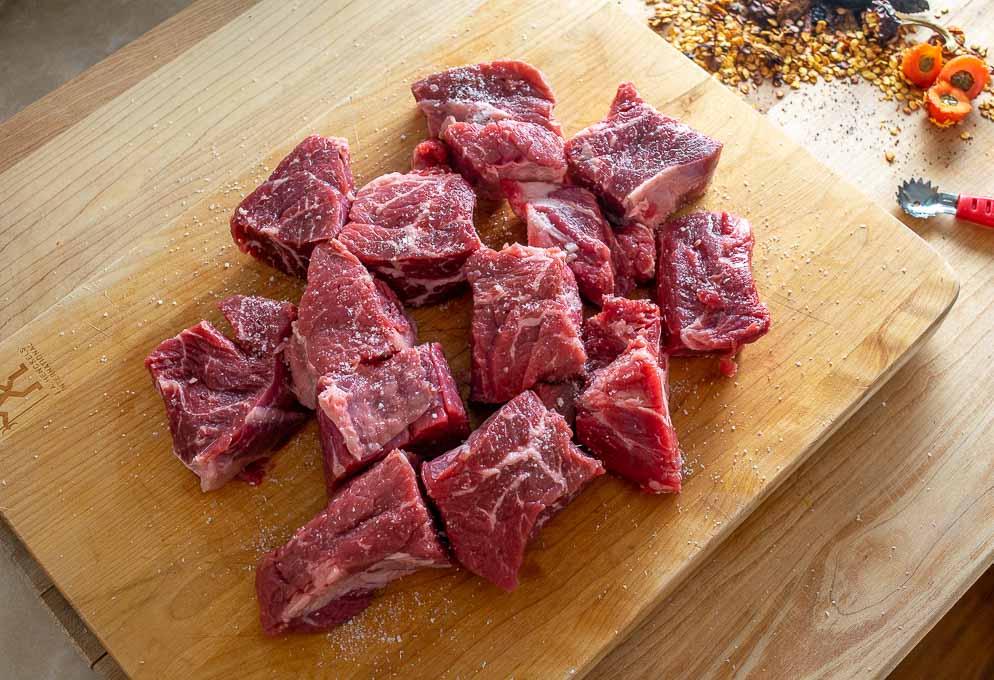
For the meat I'm using 2 lbs. of chuck roast. Best beef cuts for stewing.
Chop it into 1-1.5" chunks and give it a good salting.
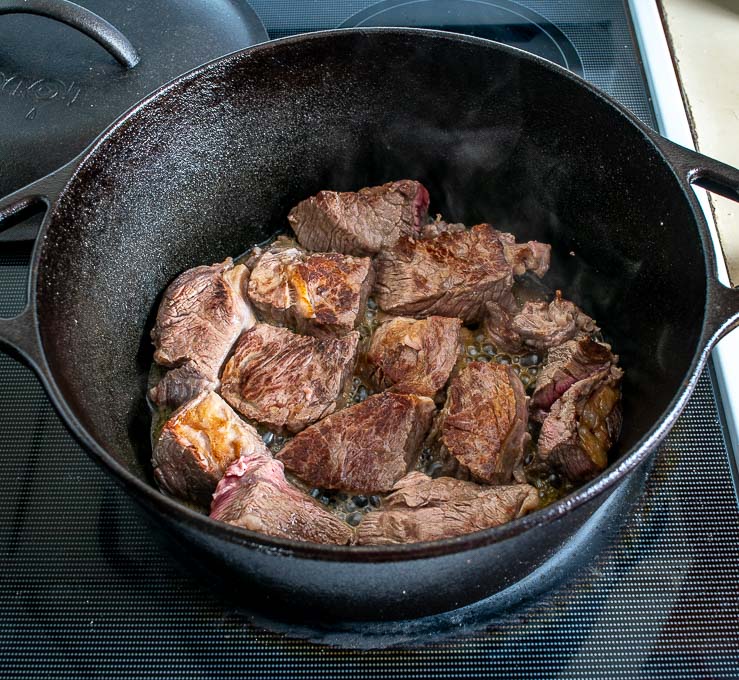
Preheat a soup pot or Dutch oven over medium-high heat and add a glug of oil.
Then give the beef a good sear on all sides.
I'm using this Lodge 5 quart Dutch oven and the recipe as written will only fill it up halfway. That's plenty of food for 4-5 people, but you can double the recipe for larger groups and it will still fit into a pot this size.
Once the beef is browned you can set the pieces aside.
In the same pan, we'll add another glug of oil and cook a finely chopped onion over medium heat until it's softened and starting to brown.
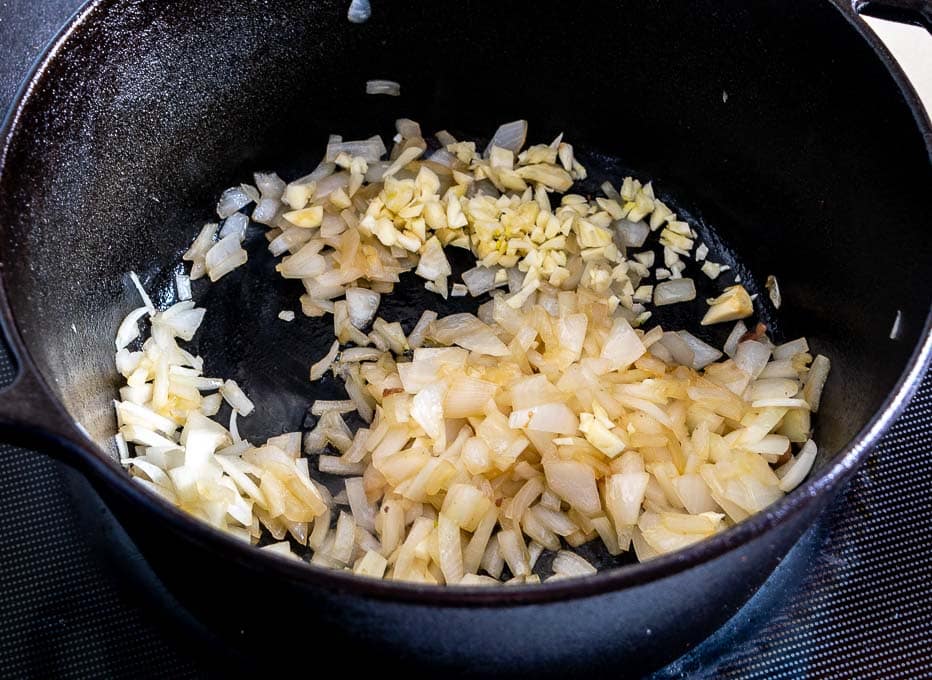
Then we'll add 4 minced garlic cloves and briefly saute.
Scoop half of the onion-garlic mixture into a blender where it will become part of the chile puree.
We'll also add one of the roasted tomatoes to the blender, along with the drained chile pieces and a single chipotle in adobo (optional).
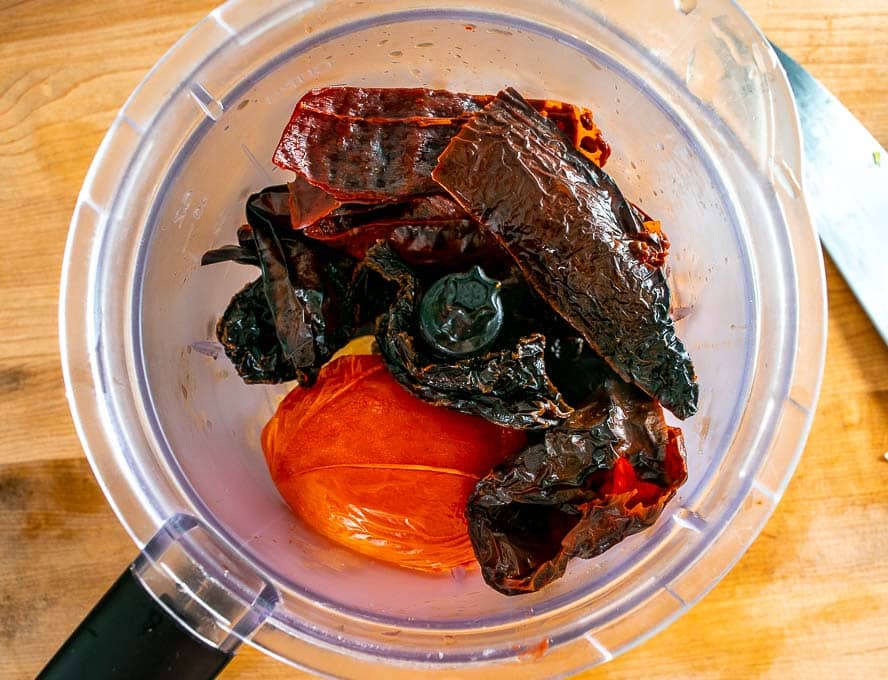
If it's your first time reconstituting dried chiles, be sure to take a taste of the soaking liquid!
If you like its flavor then you can use a single cup of it to blend the chile puree. If it tastes bitter to you then just use stock to combine the chiles.
It usually tastes bitter to me so I added a single cup of stock to the blender and gave it a whirl.
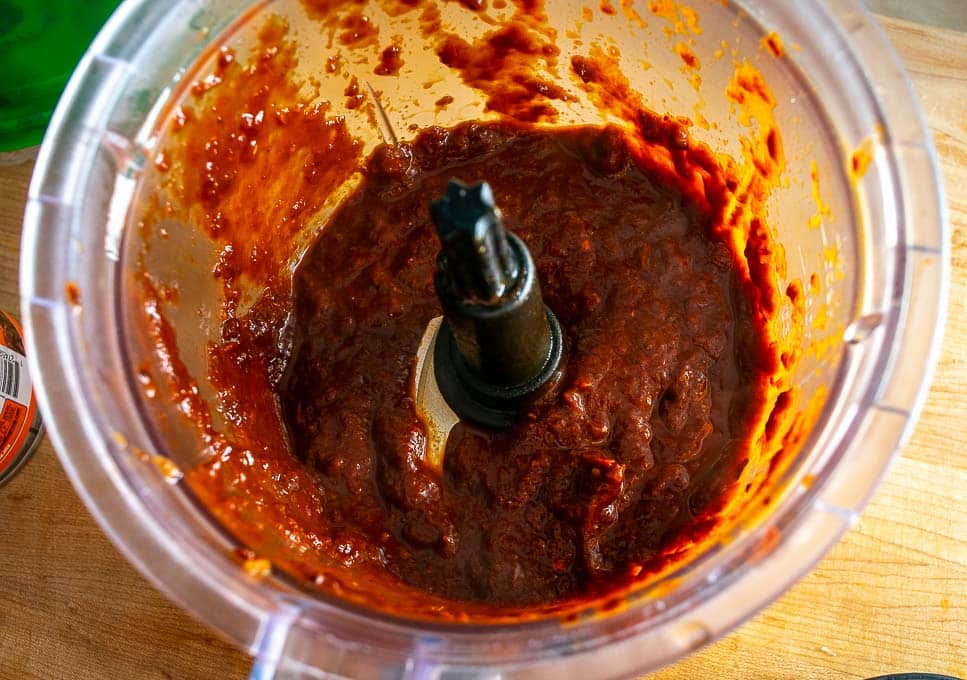
Then we'll add this chile puree to the main pot along with:
4 cups stock
1 tablespoon Mexican oregano What is Mexican oregano?
1/2 teaspoon cumin
1 teaspoon salt
freshly cracked black pepper
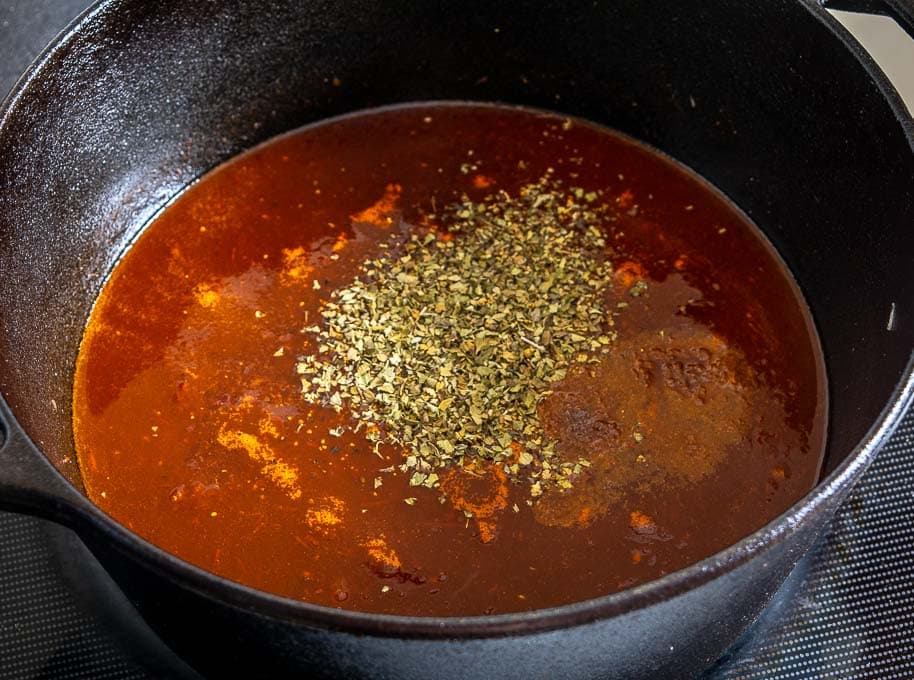
Combine well and then add the meat pieces (and their juices) and the remaining roasted tomatoes.
I usually just plop the tomatoes in and roughly chop 'em up. I think it's a real treat to get bites of these tomatoes in the final product, but of course you can consider them optional.
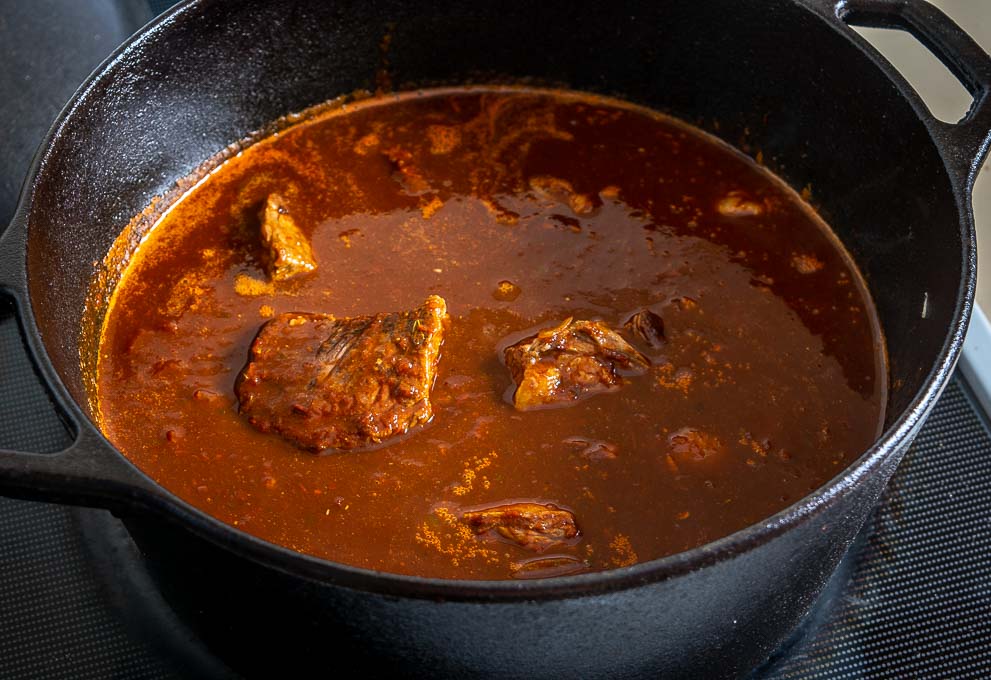
Bring this up to temp and then lower heat to a simmer. Cover and simmer until the beef is tender -- my stove needs somewhere between low and medium-low to maintain a simmer when covered.
The beef will be tender in around 1.5-2 hours. I let this batch cook for 2 hours or so.
And now the big decision of the day...
Do you like beans in your Chili?! I do but some people are vehemently opposed to it, most likely because that's what they grew up with 🙂
So I usually add in 1-2 cans of cooked black beans towards the end of the simmer, but you can consider this optional. You could also use pinto or kidney beans and get an equally good result.
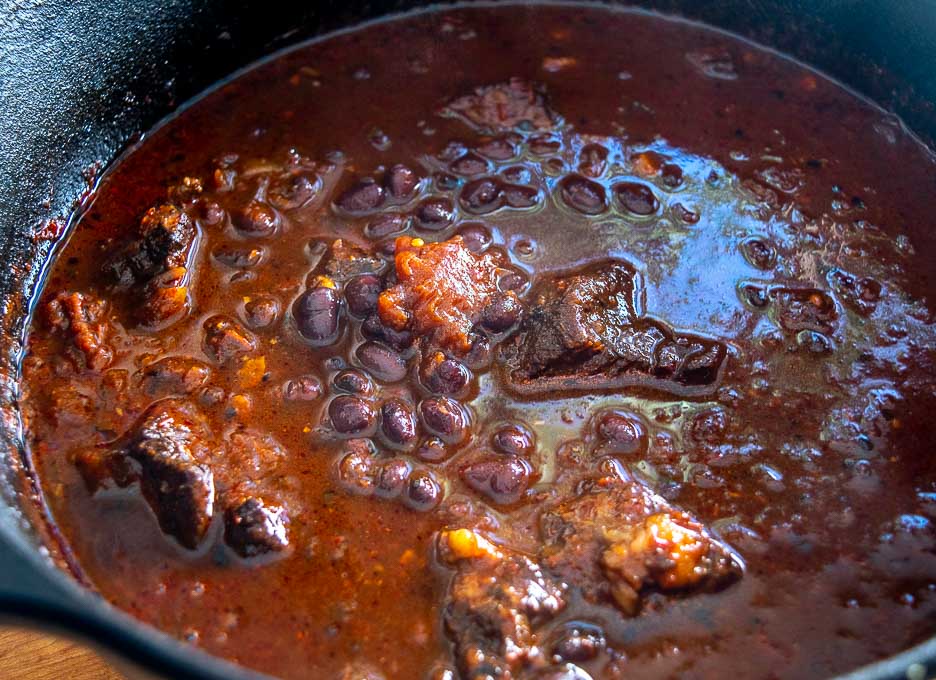
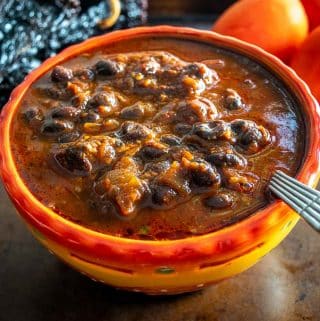
Looking good!
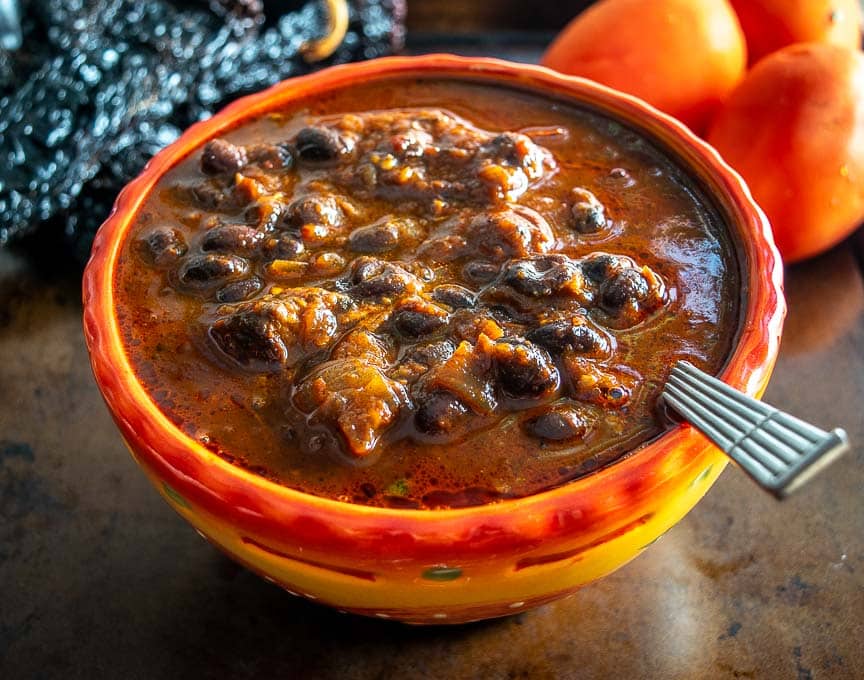
Now is a good time to take a final taste for seasoning.
I added more salt, but keep in mind the salt level will depend on which stock you're using. I used homemade chicken stock that doesn't have much salt in it.
You can also adjust the consistency of the Chili con Carne at this point. So far I've used 5 cups stock total (4 cups were added to the pot, a single cup was added to the chile puree) and I was happy with the consistency.
If your Chili is too thick for your liking after the simmer, simply add 1-2 additional cups of stock to thin it out.
If your Chili seems too thin you can always use cornstarch to thicken it up. In a small bowl whisk together a few tablespoons of cornstarch and equal parts cold water. Once combined add it to the Chili to thicken it up. More on using cornstarch to thicken soups and sauces.
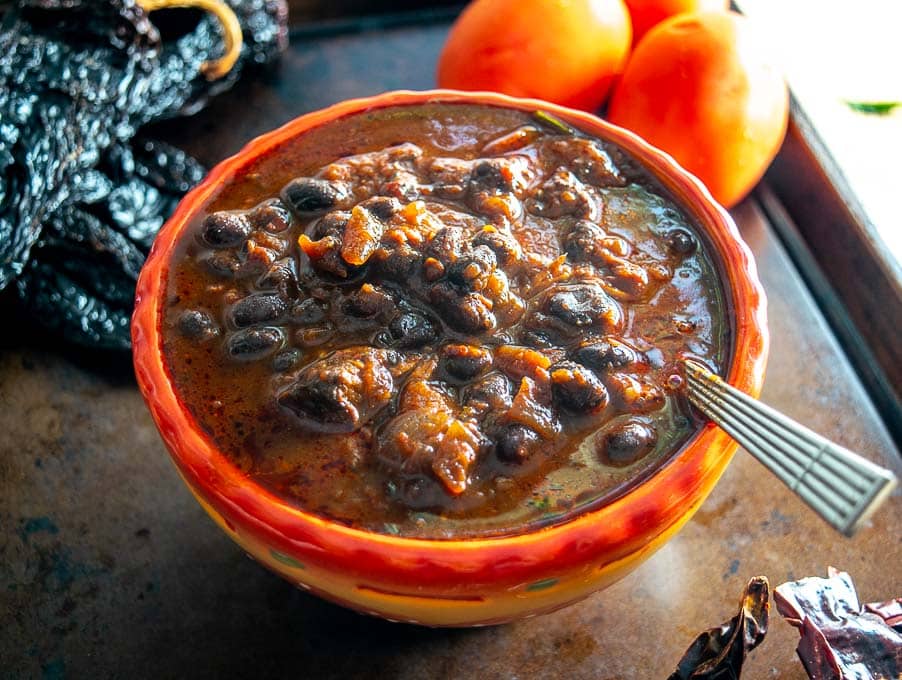
Once you're happy with the salt level and consistency you can serve it up!
I think Chili con Carne is quite comfortable in a bowl all by its lonesome, and that's how this batch was served.
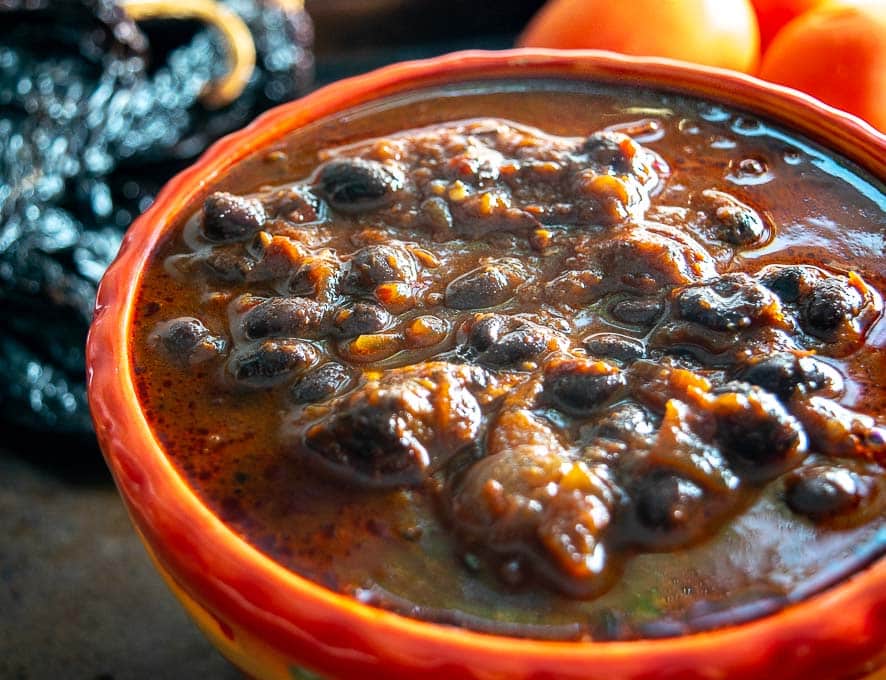
But feel free to garnish to your liking, with some good options being:
Mexican Crema
Freshly chopped cilantro
Squeeze of lime
Crispy tortilla strips
Okay, I hope this recipe gets Chili con Carne back on the regular rotation for you! It's the ultimate comfort food and building it with dried chiles will give you an instant upgrade in flavor. Feel free to use the comments section below if you have any questions about it.
Enjoy!
Want the latest recipe? Click your favorite from these options and follow me: Instagram, Facebook, Pinterest, TikTok, YouTube.
Chili con Carne
Ingredients
- 2-2.5 lbs. chuck roast
- 3 Ancho dried chiles
- 3 Guajillo dried chiles
- 1 onion
- 4 garlic cloves
- 3-4 Roma tomatoes
- 1 chipotle in adobo (optional)
- 1-2 cans beans (I used two 15oz. cans black beans)
- 5 cups stock
- 1 tablespoon Mexican oregano
- 1/2 teaspoon cumin
- 1 teaspoon salt (plus more to taste)
- freshly cracked black pepper
Instructions
- Wipe off any dusty crevasses on the dried chiles. De-stem and de-seed the chiles, but don't worry about getting rid of every last seed. Roast them in the oven for 1-2 minutes or until warm and fragrant. Add the roasted chile pieces to a bowl and cover them with the hottest tap water you've got. Let them reconstitute for 20 minutes or so.
- Rinse and de-stem the tomatoes. Roast them in a 400F oven for 20-30 minutes or until you need them.
- Preheat your main pot over medium-high heat along with a glug of oil. Chop up the chuck roast into 1-1.5" chunks and give it a good salting. You can discard any fat pieces that you don't want in your Chili. Sear the beef chunks in the pot until they are browning on all sides (tongs work great for this step). Once browned you can set the beef pieces aside.
- In the same pot, add a finely chopped onion along with another glug of oil. Cook the onion over medium heat until softened. Then add 4 minced garlic cloves and briefly cook. Scoop half of the onion-garlic mixture into the blender where it will become part of the chile puree. Note: if you're concerned about the garlic burning then add the 4 cups of stock to the main pot now while you work on the chile puree.
- Before draining the reconstituted chiles take a taste of the soaking liquid. If it tastes bitter to you then use stock to combine the chiles. If you like the flavor you are welcome to use the soaking liquid in place of the stock.
- Add the drained chiles to the blender along with a single roasted tomato and a single chipotle in adobo (optional). I usually cut off the stem and scrape out the seeds of the chipotle. Half of the onion-garlic mixture should already be in the blender. Add a single cup of stock (or soaking liquid) and combine well. Feel free to add a bit more liquid if it won't combine readily.
- Add the chile puree to the main pot along with: 1 tablespoon Mexican oregano, 1/2 teaspoon cumin, 1 teaspoon salt, freshly cracked black pepper, and the 4 cups of the stock if you have not already added it. Combine well and then add the seared beef pieces (along with their juices) and the remaining roasted tomatoes. I usually just plop the tomatoes in the pot and give 'em a rough chop.
- Bring this up to a simmer, cover, and let cook for 1.5-2 hours or until the beef is tender. This batch cooked for 2 hours. Note: my stove needs somewhere between low and medium-low to maintain a simmer in a covered pot.
- Towards the end of the simmer you can add the beans (optional). I added two cans of drained and rinsed black beans, 15 oz. size.
- Take a final taste for seasoning. I added more salt and another pinch of Mexican oregano, but keep in mind the salt level will depend on which stock you're using. You can optionally shred the beef chunks into smaller pieces using two forks, or you can just leave them as the larger chunks.
- You can also adjust the consistency of the Chili at this point if you want. To thin it out, simply add 1-2 cups of stock. To thicken it up you can use a cornstarch slurry. In a small bowl whisk together a few tablespoons of cornstarch and equal parts cold water. Once combined add the mixture to the Chili and it will thicken up considerably. More on using cornstarch to thicken soups and sauces.
- Serve immediately. I served this batch plain Jane, but optional garnishes include Mexican Crema, freshly chopped cilantro, crispy tortilla strips, and a squeeze of lime.
- Store leftovers in an airtight container in the fridge where it will keep for a few days.
Notes
Disclaimer: there are some affiliate links on this page which means I will get a small percentage of the sale if you make a purchase at no additional cost to you. But I only recommend products that I use and trust — feel free to get in touch if you have any questions about this!
Want to see the latest recipe? It's this Serrano Hot Sauce.
Still hungry?!
Want to receive Mexican Please recipes via email when they are posted? Sign up below to subscribe. All recipes are spam free.
Robert C
Ancho chiles release tannins in the water making the chile sauce bitter better to thin with tap.
Shauna
What kind of stock? You never mention which kind of stock: beef, chicken, vegetable,....?
Patrick
Hi Shauna. I typically use this chicken stock or this vegetable stock for all of my recipes and I always try to get people to make their own because it's so much better! But a storebought chicken stock will work in most recipes as a backup, even in a beef dish like this. Cheers.
Pinkney
So far, so good. I’m using ground venison and chunks of venison and sticking pretty close to the recipe. Had to dry roast some canned Italian tomatoes as that’s what I have.
The broth tastes very good. I imagine the venison cuts will tenderize nicely and add an interesting texture to the whole.
Almost any beef recipe works for venison with the caveat that has next to no fat so added fat is necessary. I used avocado oil for all the saurte’ing.
Patrick
Hey thanks for your note, so good to hear people's adjustments on this recipe! Cheers.