
How To Make Pork Carnitas
Truth be told, if you go back in time you'll find Carnitas being cooked in gobs of lard. Yes, this helps keep the pork chunks moist during the long cooking process, but the amount of lard you need is quite cumbersome and I don't think it's a sustainable method for most peeps, including me.
Luckily you can skip the lard and get equally good flavor if you give the pork a quick brine. Brining the pork in a simple saltwater mixture will help it retain moisture during the low-and-slow cooking.
So what happens if you don't brine the pork? The chunks that don't have a lot of fat in them will dry out during the cook and taste a little bland. When you combine it with the other fixings it's still going to be a satisfying meal, but the brine really takes it to another level so I highly recommend trying it.
Open any cookbook and you'll typically see brining times for pork in the 12-24 hour range. So...you want me to plan for tomorrow's dinner...today? Dream on!
But if you cut the pork shoulder into 2" chunks before submerging it in the brine then you can get away with an hour long swim in the saltwater mixture. Yes, an hour!
And it makes a world of difference. Not only is some of the saltwater absorbed during the brine for some added flava, but the salt also helps the pork retain moisture during the cooking process. More info on brining.
As a side note, brining times in general will vary based on the density of the meat, with chicken and seafood needing far less time than denser meats. I will sometimes brine a chicken breast for just 20 minutes and still get a massive upgrade in flavor, so in the future when you see brining times listed in a recipe just know that it's all negotiable!
Okay, enough brine talk, let's get cooking.
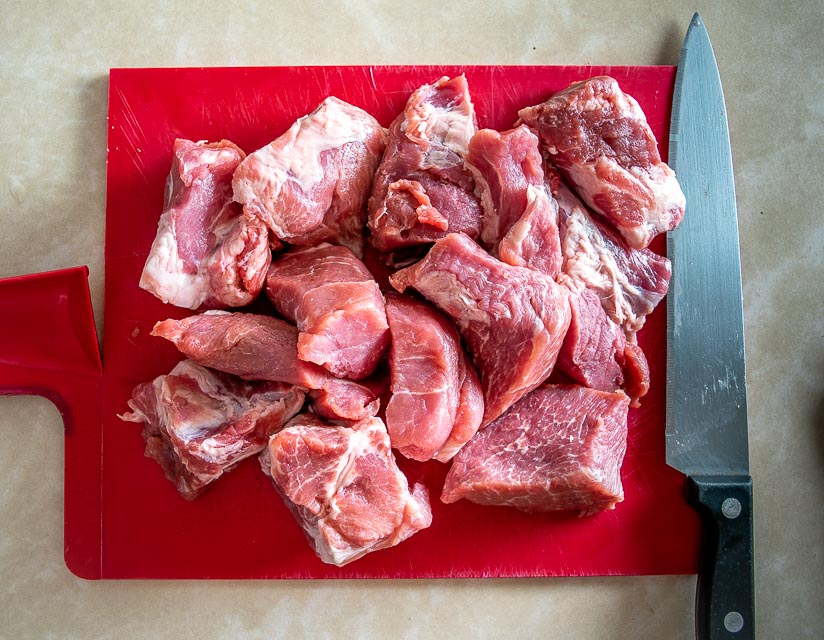
Start with 2-2.5 lbs. pork shoulder and cut it into 2" pieces.
Add 2 quarts of cold water to a bowl that's large enough to house the pork. Add 1/2 cup of Kosher or sea salt and stir to dissolve. Kosher or sea salt are typically recommended for brining as they don't have any additives.
Add the pork pieces and if they aren't fully submerged you can add a bit more water.
Cover and let it brine in the fridge for an hour.
Once brined remove the pork chunks and pat them dry. Add them to a mixing bowl along with:
2 teaspoons Mexican oregano
1 teaspoon cumin
1/2 teaspoon chipotle powder (optional)
freshly cracked black pepper
1 teaspoon salt
2-3 tablespoons olive oil
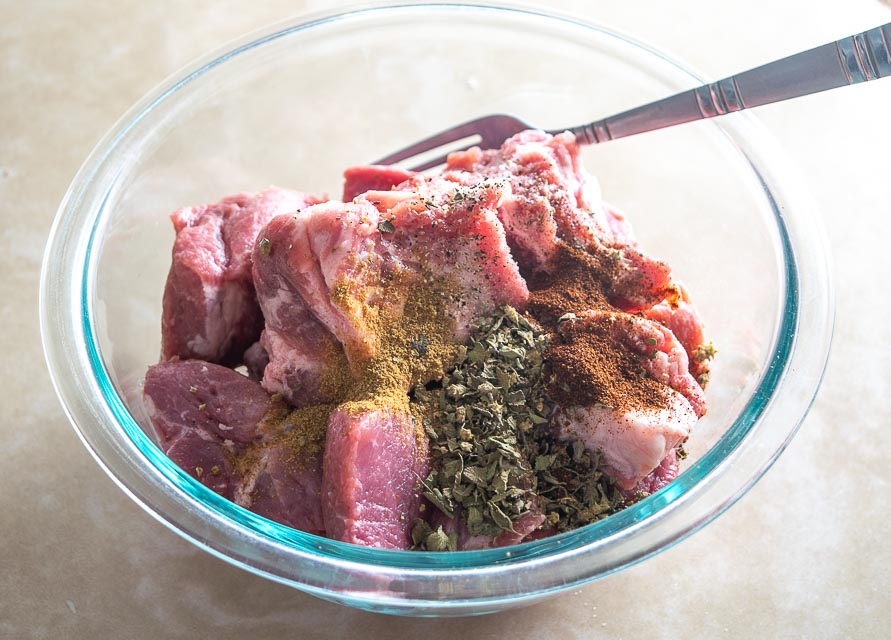
Combine well so that the pork is coated with the oil.
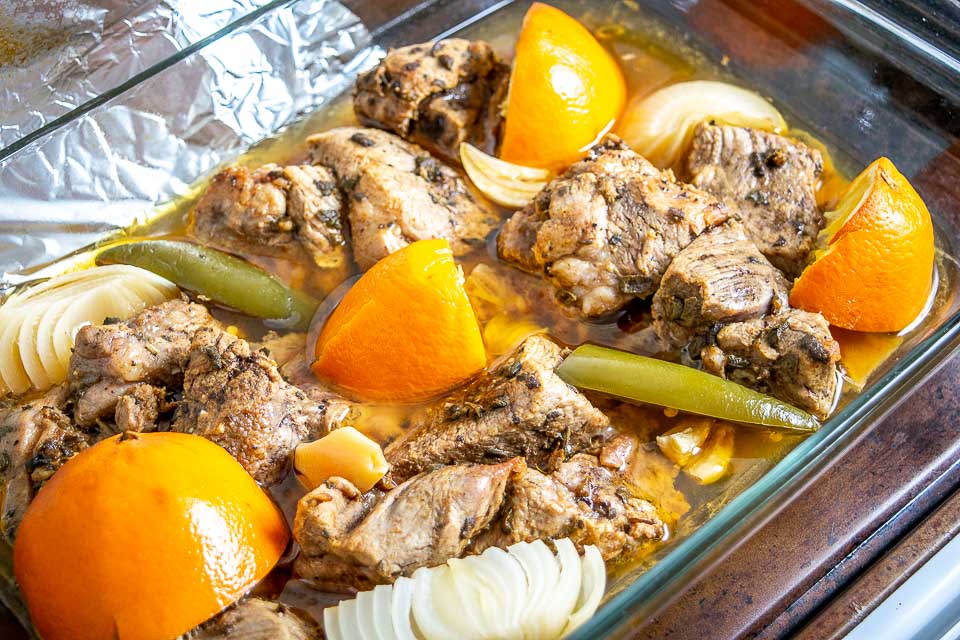
Add the pork to a casserole dish along with:
1 orange
1/2 onion
1 jalapeno
4 garlic cloves
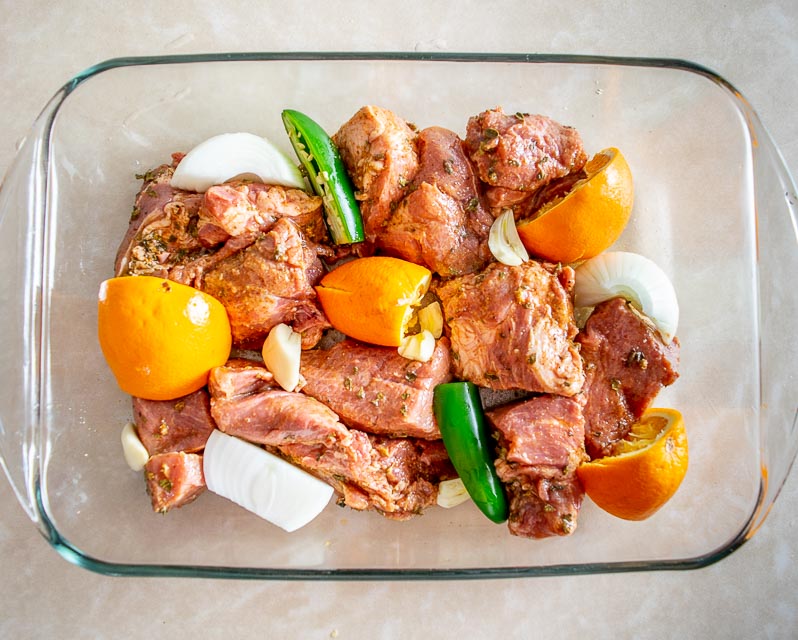
I usually squeeze the orange over the pork and then nestle the chunks amongst the meat.
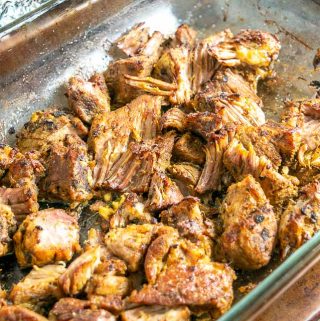
Pork shoulder responds well to low-and-slow cooking so we'll give this 3 hours in a 300F oven. Be sure to cover tightly with foil so that it retains moisture.
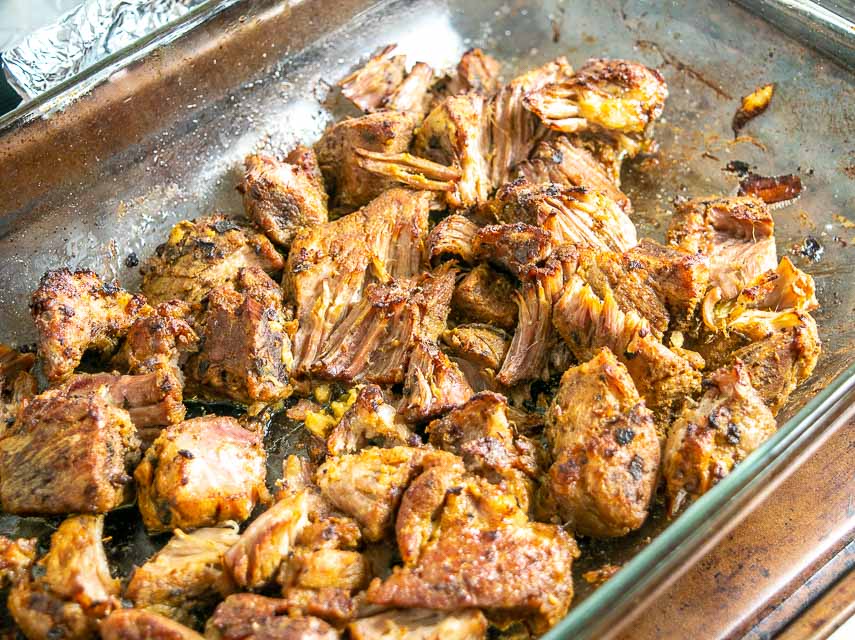
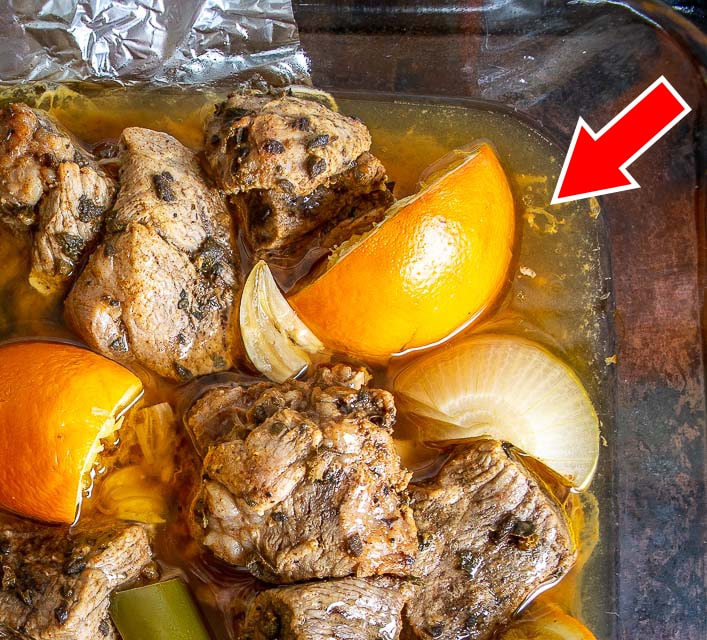
Here's how this batch looked after three hours.
Yum!
When you can stick a fork in a chunk with minimal effort then you know it's done. If it's still firm then give it another half hour or until it's fork tender.
Give the pork a taste test. It should be well seasoned, moist, succulent. Brine for the win!
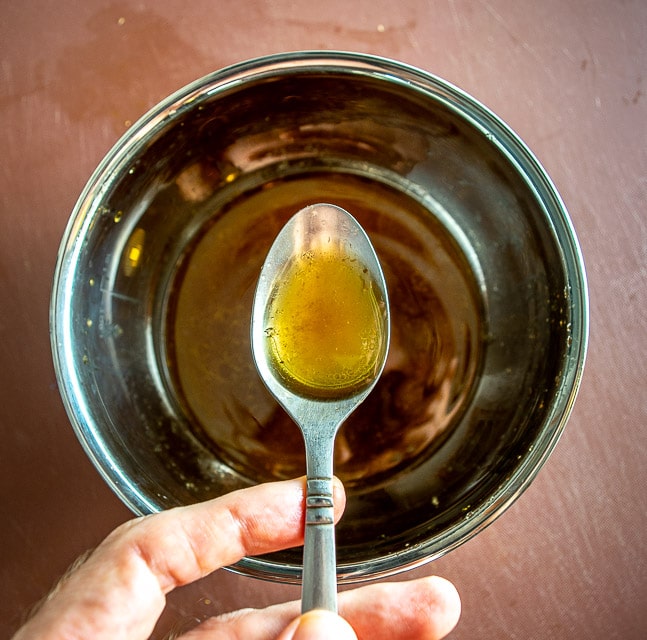
Equally important though is the resting liquid. Give it a taste.
It has one of the most satisfying flavors in all of Mexican cuisine! Hints of sweet citrus, heat from the jalapeno, savory rich pork flavor, and some real depth from the Mexican oregano and cumin.
I think it's an incredibly savory flavor and could drink it up with a straw, but of course, I might be biased 🙂
This resting liquid is your secret weapon. When you combine it with the already flavorful chunks of pork then you've got some real deal Carnitas on your hands.
I think the pork is already good enough to be eaten as is, but Carnitas will traditionally by crisped up so let's do that for this batch.
Turn the broiler on and remove the resting liquid from the pan. When you set the resting liquid aside you'll probably notice that the fat is rising to the top. Drizzling some of this fat onto the pork chunks will help it crisp up quicker -- and taste better!
We're going to put the pork under the broiler for 5 minutes or so. You can shred the chunks using two forks or leave them as is, your call.
Take a look after 5 minutes. If you want it crispier then give it another five minutes.
I prefer semi-crispy chunks so this batch was in for about 6-7 minutes.
So if all has gone according to plan you've got well-seasoned, savory, crispy Carnitas on your hands. Taste good?
And don't shy away from using more of the resting liquid after you've crisped up the pork chunks. You can always drizzle more on top before serving, with the option of discarding some of the fat that rises to the top, or even better, using it!
By the way, that resting liquid is your secret weapon if the brine time is impossible for you (what?!). As mentioned, some of the less fatty pork chunks will come out dry if you skip the brine, but if you shred and then toss them with the resting liquid you can rescue them. We use that method in the hands off Slow Cooker version so it's something to keep in mind for emergencies.
If, like me, you find yourself eating the Carnitas directly from the roasting pan then that's a viable serving option too!
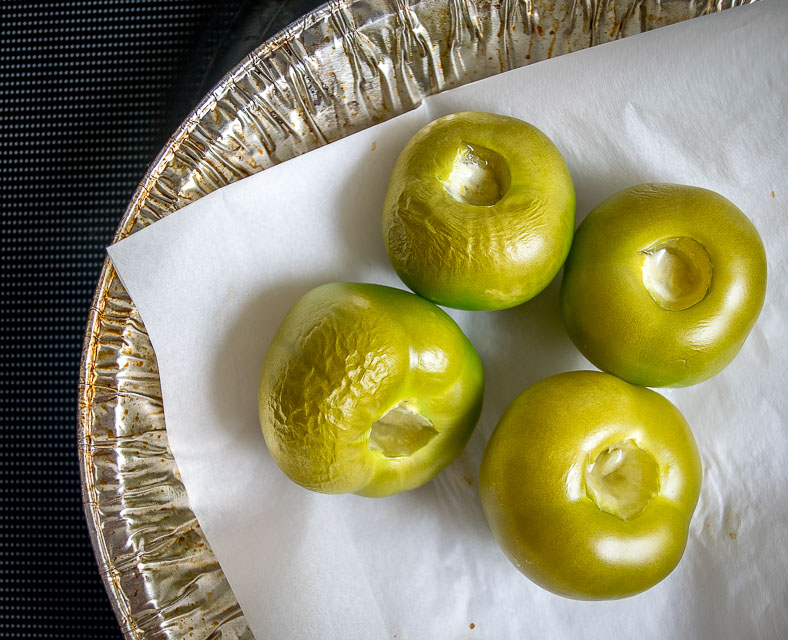
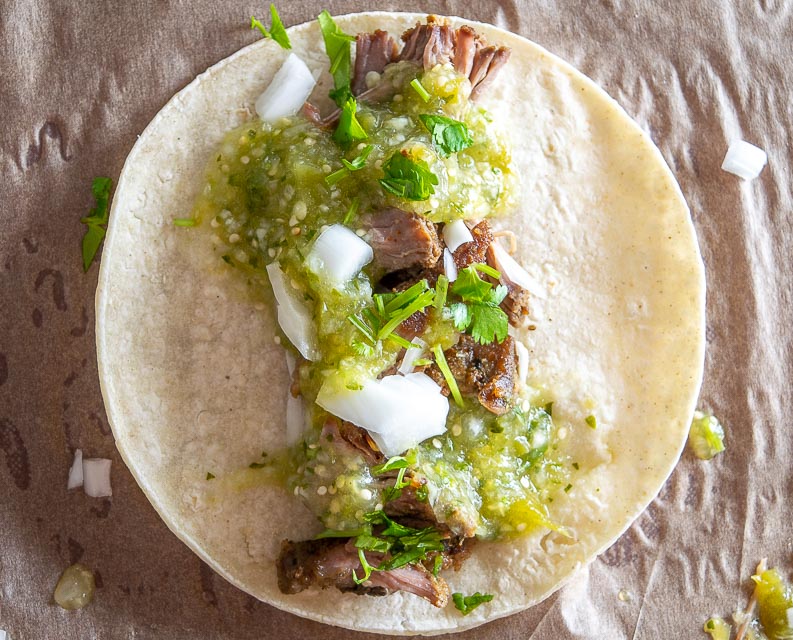
But a more traditional route is a Carnitas tacos topped with a freshly made Salsa Verde. This is a wicked combo to try so I'll put directions for it in the recipe box below. All you need to do is plop some tomatillos in the oven for the last 20 minutes of the pork roasting period and blend them with:
1/2 onion
1 garlic clove
2 serranos
8-10 sprigs cilantro
Yes, two serranos!
Normally a half serrano is a good starting point for Salsa Verde, but I made this version super sharp so it can compete with the big flavor or the Carnitas. Dial back on the serrano if you want a milder version.

And one last thing...
Try crisping up the tortillas to see how your palate reacts. I love it when the tortillas are warm and semi-crispy as it seems to make everything taste better. Just give them a minute or so in a dry skillet over mediumish heat.
Top each crispy tortilla with Carnitas, Salsa Verde, finely chopped raw onion, and freshly chopped cilantro. Not pictured is some cheese that is definitely worth considering.
Moist, succulent, crispy Carnitas in the house!!
Okay, let me know if you have any questions about the brining process for these Carnitas. It's a great technique to add to your repertoire and will offer up some instant upgrades for your next meal.
Enjoy!
Want the latest recipe? Click your favorite from these options and follow me: Instagram, Facebook, Pinterest, TikTok, YouTube.
Delicious Carnitas Recipe
Ingredients
- 2-2.5 lbs. pork shoulder
- 1 orange
- 1 lime
- 1/2 onion
- 1 jalapeno
- 4 cloves garlic
- 2 teaspoons Mexican oregano
- 1 teaspoon cumin
- 1 teaspoon salt
- freshly cracked black pepper (approx. 1/2 teaspoon)
- 2-3 tablespoon oil
For the Salsa Verde:
- 4-5 tomatillos
- 1/2 onion
- 1 garlic clove
- 2 serrano peppers (or jalapenos)
- 10-12 sprigs cilantro
- salt to taste
For serving:
- 12-16 corn tortillas
- 1/2 cup finely chopped onion
- freshly chopped cilantro
- 3-4 limes
- cheese
For the brine:
- 1/2 cup sea or kosher salt
- 2-3 quarts water
Instructions
- Add 2 quarts cold water to a mixing bowl along with 1/2 cup kosher or sea salt. Stir to dissolve. Cut the pork shoulder into 2" chunks. Add the pork chunks to the brine, cover, and store in the fridge for an hour. If the pork isn't completely submerged just add a bit more water.
- Once brined, remove the pork chunks and pat them dry. Add them to a clean mixing bowl along with: 2 teaspoons Mexican oregano, 1 teaspoon cumin, 1 teaspoon salt, freshly cracked black pepper, and 2-3 tablespoons oil. Combine well. Note: I also added 1/2 teaspoon chipotle powder to this mixture but you can consider that optional.
- Add pork pieces to a casserole dish along with the juice of 1 orange, the juice of 1 lime, 1/2 onion cut into chunks, 1 jalapeno sliced in half, and 4 peeled garlic cloves. I usually put the leftover orange pieces in the pan as well. Cover tightly with foil and bake at 300F for three hours.
- After three hours give it the fork tender test. If you can insert a fork into the pork with no resistance then it's done. If the chunks are still firm give it another half hour.
- Remove the pork and set aside. Strain the resting liquid into a bowl and be sure to give it a taste! As it sits the fat will rise to the top -- you can remove some of the fat if you want but I use most of it.
- To crisp up the Carnitas we'll put the shredded pork chunks under the broiler (approx. 525F). You can use the same baking dish, just be sure to remove the leftover fruit and veggie chunks. Add the pork back to the dish and shred with two forks. I usually give it a partial shred, leaving it chunky, but you can always shred finer if you want.
- Drizzle some of the resting liquid over the pork and broil for 5 minutes. Take a look and broil for another 5 minutes if you want it crispier.
- To make the Salsa Verde, it's best to put the tomatillos in the oven about 20-30 minutes before you think the pork will be done. Pull the husks off the tomatillos , give them a good rinse, and cut the stems out. Roast the tomatillos in the oven for 20 minutes or until they start to turn army green. They'll need a bit more time to roast because the oven temp is lower than usual. Add roasted tomatillos to a blender along with 1/2 onion, 1 garlic clove, 10-12 sprigs cilantro, and 1-2 serrano peppers. Combine well and taste for heat level. For a milder version start with 1/2 serrano pepper and add more to increase the heat.
- For serving you'll need corn tortillas, 1/2 cup finely chopped onion, some freshly chopped cilantro, the Salsa Verde, 3-4 limes, and cheese (optional). You can warm up the tortillas in the oven but you'll get happier faces if you crisp them up in hot dry skillet first. I usually put a large skillet over medium high heat and crisp up 3-4 at a time, storing them in a tortilla warmer or tea towel.
- If there are Carnitas leftovers, store in an airtight container in the fridge. I usually store the resting liquid separately. To re-heat, simply add pork to a saucepan along with some of the resting liquid, cover, and simmer over medium until heated through.
Notes
Still hungry?!
Want to receive Mexican Please recipes via email when they are posted? Sign up below to subscribe. All recipes are spam free.
Kat
This was incredible and, yes, that cooking liquid is amazing. We will definitely make this again - the house smelled so good while it was cooking! We were happy it tasted as good as it smelled.
Patrick
Ahh great news, thanks Kat!
Karin Foster
I made this last weekend and brined the pork for a few hours - I had the time!! It was worth it. It was delicious and had some left over to stuff a zucchini from the garden with carnitas, onions, chilis, and tomatoes. Yes, topped with queso. So good. I can't eat carnitas often, but when I do, this will be my go to recipe.
Patrick
Oh wow sounds delicious! Thanks Karin for the inspiration. Cheers.
Tom Hubbard
After brining, can the pork be smoked for awhile in my Traeger?
Patrick
Hey Tom, I haven't tried that yet but it should work fine. Cheers.
Kevin
This was delicious and easy to prepare for a large group of guests. Great flavor without having to pull away for prep. Definitely will make it again!!
Thanks Patrick
Patrick
Yum, now thinking about making a batch 🙂 Cheers.
Connie
I have made this numerous times and it's a hit! Can't go wrong with this recipe and I don't change a thing. I NEVER post so this says something about this recipe. Well...all your recipes! My kids are on board with your website too.
Patrick
Thanks Connie!
Georgina G-M
This is a great recipe. My friend was literally dancing in her chair as she feasted on this delightful dish. I used a pork loin, and it was fine. I did brine it for 3 hours to help break down the meat. I also seared it on the stove after the brining. I also used an Instapot. I pressure-cooked it for 2 hrs and 10 minutes using beef broth for the liquid for a six-pound pork loin. It was well worth the time to make the salsa. I will always double it, as it goes great with eggs the next day for breakfast, with the salsa poured over it
Patrick
Hey thanks much for mentioning your adjustments Georgina! Cheers.
Amy Starbuck
My new favorite recipe! So good I usually double it ❤️
Patrick
🙂
Pete
Great recipe - have made multiple times. Do you think it will be too salty if I brine the chunks overnight? I want to get it in the oven early in the morning (making a big batch) for an afternoon party.
Thanks
Patrick
Thanks Pete! Hmmm tough one as I haven't tried that, but I think I would just go for it in your shoes. Big cuts of pork shoulder typically brine overnight, so your smaller chunks may take on a bit more compared to that, but most likely it won't be excessive. Cheers.
Michael in Palm Desert (100 miles from Mexico)
I have brined the pork overnight many many times, always turns out deliciously great.
Patrick
Thanks for mentioning this Michael!
SHARON OLIVER-FOURNIER
Super Sabroso!
Patrick
Thanks Sharon!